
In his third book, Wild Creations, Baltimore-based “plantfluencer,” horticulturist, and interior plant designer Hilton Carter shares too many great ideas for incorporating house plants into your home decor to count. His DIY projects range from hanging wall planters to creating floral candles, or covering walls with moss. But the one project that stopped us in our tracks is the plant chandelier: A long, narrow hanging planter suspended over a table that Carter describes as “beautifully strange, robust orbs…like traditional light fixtures, but alive and without luminosity.” It was a plant chandelier that inspired Carter, after he spotted one in a cafe, to fill his own home with greenery back in 2011. A decade later, Carter has a limited edition line of planters and garden accessories at Target and a massive presence on Instagram. Will a plant chandelier change your life like Carter’s? Likely not. But it might be fun to try.
What You Need:

Wooden container e.g. a canoe or wine crate
Plants and soil
Spray can of clear-coat wood sealant
Heavy-duty plastic sheet (a heavy-duty trash bag will do)
Staple gun and staples paintbrush
Electric drill with ¼ in. (6.5 mm) wood drill bit
4 x carabiners (size and color of your preference)
4 x eye hooks
2 x drywall anchors (if necessary)
Chain or rope to hang the chandelier
Instructions
Before you begin your project, it is important to first figure out where in your home you are going to be hanging your plant chandelier and how high or low you would like it to hang. Once you have located that spot and measured the distance from the ceiling to where it will hang to, purchase rope, chain, or whatever you would like to use to hang your chandelier with. For these projects I decided to use a chain because it added a little hardness to the softness of the wood and greenery.
Select a container for your plants. This container will make just as much of a statement as the plants, so be creative. Anything from a wine crate to a canoe will work. When making this decision, consider using hardwoods such as white or red oak that are more water-repellent, or woods like cedar that are bug-repellent. I used a salvaged wood container that was once used for industrial molds.

First, Drill a Drainage Hole
Take the drill and, with a wood drill bit, drill a hole in the bottom of the container to create drainage. You’ll want to make sure your chandelier can properly drain to avoid overwatering and root rot.

Clean the Container to Prepare for Sealant
Wipe away any sawdust or dirt with a dry rag.

Preserve the Wood to Ensure Longevity
Open the can of wood sealant and with a paintbrush, evenly paint a coat to help seal the wood so that it can be well-preserved.

Prevent Water Damage
Measure the inside of your container and cut out a piece of heavy-duty plastic sheet to fit within that space. The plastic sheet is to better protect the wood from water damage and also helps to force all the runoff water through the drainage hole rather than the pores in the wood.

Then Staple in Plastic Sheet
Fold in the plastic sheet and, using the staple gun, staple along the top of your container to secure it.
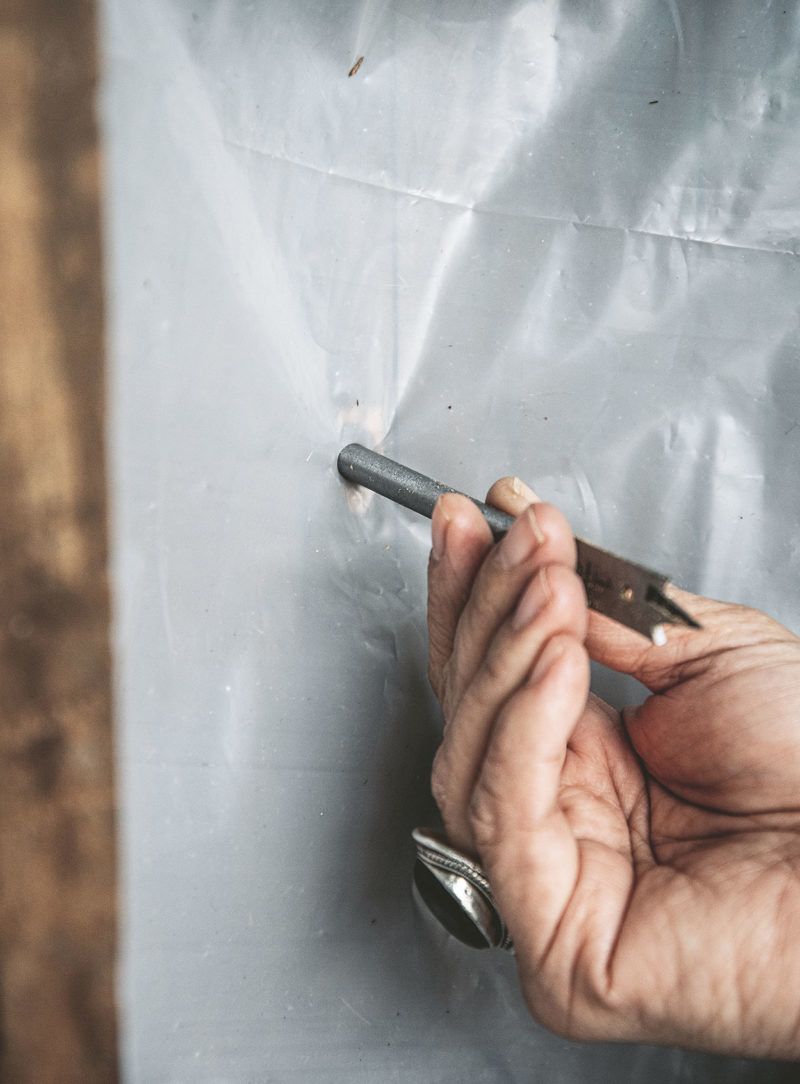
Open Drainage Hole with Drill Bit
With the blunt end of the drill bit, punch a hole through the plastic into the drainage hole.

Select Your Favorite Plants
Select the plants you want to place in your chandelier. If you’re going to use different types of plants, make sure they require the same type of soil and moisture level. Once you know what types of plants you’d like to use, make sure to choose plants with root balls that will fit in the base of your container with at least 2 in. (5 cm.) of space around them.
Pot your plants in your container. Remember to use a potting mix that works best for the plants you’re using. I used a ratio of 80 percent potting mix and 20 percent perlite for these plants.

Install Eye Hooks for the Chain
Screw the eye hooks into the sides of your container, making sure they are secure.

Hook Carabiners to the Eye Hook
Hook the carabiners around each eye hook and around the end of the chain or rope. Tighten the carabiners.

Attach Chains to Hang Planter
With the weight of the container, the soil, and the plants, making sure your plant chandelier is properly secured is very important. Please make sure to screw the second pair of eye hooks into studs or use proper drywall anchors. Hook the last two carabiners around the eye hooks in the ceiling and, finally, hook both ends of the chains to those carabiners. Tighten the carabiners and enjoy!
How to water: Start slow and place a small bowl or vessel below it to capture any runoff that comes out. You don’t want to fill the container with too much water. If it gets too heavy it could pull the hooks out of the ceiling.


![A Tranquil Jungle House That Incorporates Japanese Ethos [Video]](https://asean2.ainewslabs.com/images/22/08/b-2ennetkmmnn_t.jpg)


